Merkury LED Lights APP Remote Control
Merkury Innovations Smart Wifi LED Strip instructions
SMART WI-FI LED STRIP START GUIDE USR MANUAL
Merkury LED Strip Instructions
Reset Merkury LED Strip Lights
- Reset once (press & hold reset button) to reach Easy Mode, which is the primary way the app will try to connect. (When in Easy Mode, you’ll see the LED flashing quickly, 2x per second)
- Reset again (press & hold reset button) to reach AP, which is the Backup Mode to help connect.
- (When in AP Mode, you’ll see the LED blinking slowly, every 3 seconds)
- Merkury LED Strip Lights Reset complete!
Geeni APP Download – APPLE IOS
- Search “Geeni” on Apple Store and download
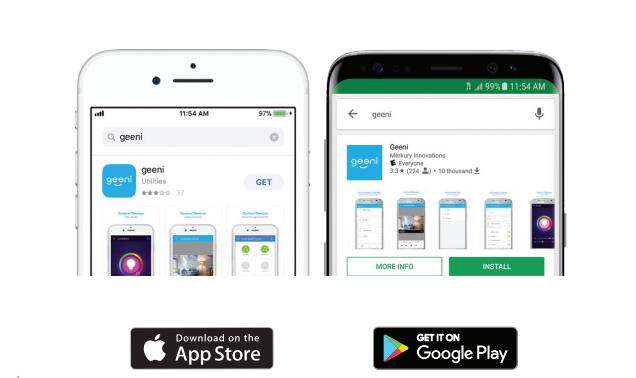
Geeni APP Download – Android
- Search “Geeni” on Google Play Store and download
Register an account on Geeni app
- You need Register an account when you use Merkury LED Strip Lights
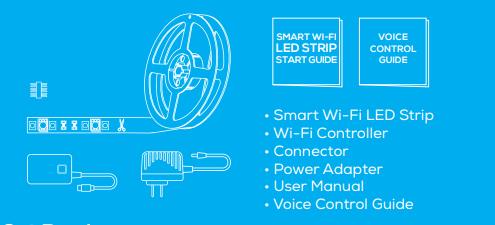
Package of Merkury LED Strip Lights
- Smart Wi-Fi LED Strip
- Wi-Fi Controller
- Connector
- Power Adapter
- User Manual
- Voice Control Guide
Get Ready Install Merkury LED Strip Lights
- Know your Wi-Fi network and password
- Make sure your mobile device is running iOS 8 or higher or Android™ 4.1 or higher
- Make sure you’re connecting to a 2.4GHz Wi-Fi network (Geeni can’t connect to 5GHz networks)
- NOTE: Geeni can’t connect to 5GHz networks. *If the connection fails, try to connect using AP Mode
System Requirements
- Mobile device running iOS® 8 or higher or Android™ 4.1x or higher
- Existing Wi-Fi Network
Technical Specifi cations
- Size: 0.5in x 118in
- Brightness (white): 1500 lm
- Input: 100-240V, 50/60Hz
- Life Span: 25000 Hours
- Weatherproof:
- IP44 (strip), IP20 (controller)
- Wi-Fi: IEEE 802.11N, 2.4GHz (not compatible with 5GHz Wi-Fi networks)
How to Install Merkury LED Strip Lights
Merkury LED Strip installation
Merkury Innovations LED Strip installation
Merkury LED Strip setup
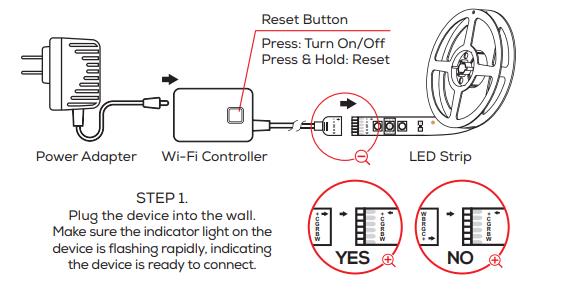
- STEP 1.
Plug the device into the wall.
Make sure the indicator light on the device is flashing rapidly, indicating the device is ready to connect. - STEP 2.
Measure the area you wish to attach the LED strip to. Ensure that the area has a clean, solid surface. - STEP 3.
Measure the LED strip for the desired length, starting at the end closest to the connector for the Wi-Fi Controller.
IMPORTANT: If you measure & cut from the opposite end, you will not be able to connect the LED strip to the Wi-Fi Controller - STEP 4.
Follow the instructions to choose the device from your Wi-Fi list. - STEP 5.
The device will connect.
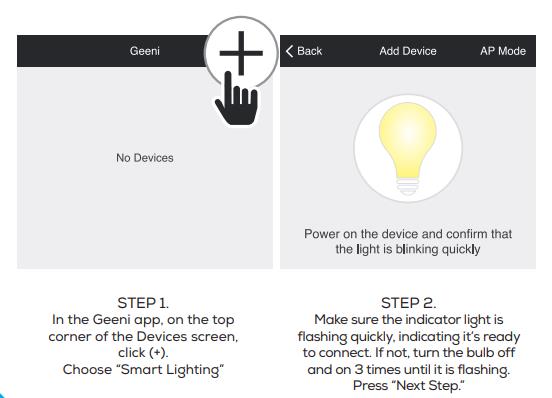
Add device to Merkury Geeni APP Method 1: Easy Mode
- STEP 1.
In the Geeni app, on the top corner of the Devices screen, click (+).
Choose “Smart Lighting” - STEP 2.
Make sure the indicator light is flashing quickly, indicating it’s ready to connect. If not, turn the bulb off
and on 3 times until it is flashing.
Press “Next Step.” - STEP 3. Enter your Wi-Fi network and password.
- STEP 4.
The Geeni app will try to connect your device.
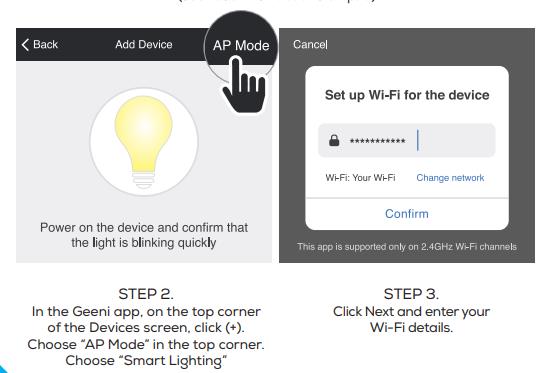
Add device to Merkury Geeni APP Method 2: Backup AP Mode
- STEP 1.
Make sure the device is in AP Mode, blinking slowly, see reset instructions - STEP 2.
In the Geeni app, on the top corner of the Devices screen, click (+).
Choose “AP Mode” in the top corner.
Choose “Smart Lighting” - STEP 3.
Click Next and enter your Wi-Fi details. - STEP 4.
Located the closest cut mark to your desired length. Each strip has cut markings located every 10cm.
Take a sharp pair of scissors or blade, and cut along the cut mark. - STEP 5.
Remove the protective film from the adhesive backing to mount the LED strip to the desired area.
Troubleshooting
Cannot connect to your Wi-Fi network.
Merkury LED Strip not connecting
Merkury LED Strip not working
- Make sure you entered the correct Wi-Fi password during the Wi-Fi setup.
- Check whether there are any Internet connection problems.
- If the Wi-Fi signal is too weak, reset your Wi-Fi router and try again.
Can I share with family and friends?
- Yes, you can share your bulbs with family and friends who will have access to control your bulbs, plugs, cameras, and other Geeni devices. In the Geeni app, press the Profile button and click on the “Device Sharing” button, and you will be able to give or revoke sharing permissions.
- In order to share, the other user should already have downloaded the Geeni app and registered a new account.
Can I group multiple Geeni devices together?
- Yes, you can group multiple devices of the same type together, by room, location, or however else you want. The same devices can be in multiple groups. (For example, create a group for “Bedroom” and another group for “Entire House”, and your Bedroom lights can be included in both groups). From your main device list, click on one of the devices you want to group, press the “•••” button on the top right for advanced settings, and click Create Group. You’ll then be able to choose which devices you’d like to group together and will be able to rename them.
How Many Devices Can I Control?
- Geeni’s app can control an unlimited amount of devices in an unlimited amount of locations. Your router may have a limit of how many devices can be connected to one router.
My Geeni device has a funny name. How do I rename it?
- From your main device list, click on one of the devices you want to rename, press the “•••” button on the top right for advanced settings, and click Modify Device Name (or Modify Group Name, if applicable). You’ll then be able to choose a more familiar name.
The device appears offline or unreachable, what should I do?
- Make sure your Wi-Fi router is online and in range.
- Make sure you have the latest Geeni functionality by clicking “Check for firmware update” in your device settings.
What’s the Wireless Range?
- The range of your home Wi-Fi is heavily dependent on your home router and the conditions of the room. Check with your router specifications for exact range data.
If my Wi-Fi/Internet goes down, will Geeni still work?
- Geeni products need to be connected to Wi-Fi in order to use them remotely.
FCC Notice:
This device complies with Part 15 of the FCC Rules. Operation is subject to the two following
conditions:
This device may not cause harmful interference.
This device must accept any interference received, including interference that may cause
undesired operation.
Note: This equipment has been tested and found to comply with the limits for a Class B digital
device, pursuant to Part 15 of the FCC Rules. These limits are designed to provide reasonable
protection against harmful interference in a residential installation.
Important Information:
Before installing, read and follow all precautions, including the following:
CAUTION: RISK OF ELECTRIC SHOCK OR BURNS – USE IN A DRY LOCATION ONLY.
The weather resistant IP44 rating only protects the LED strip from splashes in any direction.
DO NOT IMMERSE IN WATER.
WARNING: The LED strip must be unplugged when making any modifications to the device.
Electrical currents are dangerous and may cause electrical shock, injury, or death (in some
cases).